10+ Unique Ways – How To Use Notion [Aug 2023]
Introduction
Hey there, productivity enthusiasts! Welcome to the exciting world of Notion – an all-in-one workspace that’s transforming the way we organize, manage, and streamline our digital lives. From note-taking to task management, from creating databases to setting reminders, Notion is a powerhouse of features wrapped up in a sleek, user-friendly interface. In today’s fast-paced world, where information overload is a common challenge, having a robust organization and productivity tool like Notion is not just an advantage – it’s a necessity. So, let’s jump in and explore how to use notion and the myriad ways it can supercharge your productivity game!
Other posts you may like about Notion!
- Notion pricing – how to pick the best plan for you
- Notion Habit Tracker: How To Get More From Your Time
- 10+ Unique Ways To Use Notion
- 40+ Useful Notion Templates
- How to use Notion planner
Brief overview of Notion and its features
Let’s dive into an exciting and empowering tool that’s been making waves in the productivity space – Notion. Simply put, it’s your one-stop shop for everything related to organization and collaboration.
Notion is a unique blend of powerful features that combines note-taking, task management, databases, and so much more. It’s like having a personal assistant, project manager, and filing system all rolled into one user-friendly platform. But what truly sets Notion apart is its adaptability. With this tool, you can customize your workspace to fit your needs and working style perfectly. Get to know more about notion pricing here.
So whether you’re a student juggling assignments, a professional managing projects, or someone just looking to bring a bit more order to their life, Notion could be just what you need. It’s more than just a tool; it’s a way to empower yourself, take control of your workflow, and make the most of your time.
Importance of organization and productivity tools
In today’s fast-paced world, it feels like we’re juggling a million things at once, doesn’t it? Between work tasks, personal projects, and those never-ending to-do lists, it can be hard to keep everything straight. With the right organization and productivity tools, we can take control of our time, streamline our workflows, and truly make every moment count. These powerful tools are more than just digital notepads or calendars – they’re our allies in achieving our goals. They help us organize our thoughts, manage our tasks, and stay on top of our game. And in a world that’s increasingly remote and digital, they’re more important than ever.
How to use Notion
Setting Up Your Notion Account: A Simple, Step-by-Step Guide
If you’re here, it means you’re ready to dive into the world of Notion – an all-in-one workspace where you can write, plan, collaborate, and organize. And the best part? It’s incredibly user-friendly and provides free plans, so you’ll be able to set up your notion user account in no time.
Steps to Download and Install the Notion App on Various Platforms
Notion is available on a variety of platforms, making it super accessible no matter what device you’re using. Here’s how you can download and install it:
On Your Desktop (Windows/Mac):
- Head over to Notion’s website.
- Click on ‘Download’ in the top right corner.
- Choose the version that suits your operating system (Windows or Mac).
- Once the download is complete, open the file and follow the on-screen instructions to install Notion.
On Your Smartphone (iOS/Android):
- Open the App Store (for iOS users) or Google Play Store (for Android users).
- Search for ‘Notion’ in the search bar.
- Tap on ‘Install’ or ‘Get’.
- Wait for the app to download and install on your phone.
Creating Your First Notion Account and Workspace
Now that you’ve got Notion installed, it’s time to create your account and your first notion workspace. Here’s how:
- Open Notion on your device and click on ‘Sign Up’.
- You can sign up with your Google account, or use your email address.
- Verify your account through the link sent to your email (if you chose the email option).
- Now, you’re all set to create your first workspace. Click on ‘Create New Workspace’.
- Name your workspace (you can always change this later).
- Invite others to join your workspace by entering their email addresses which will allow them to create their notion accounts or skip this step for now.
By following these steps, you’ve successfully set up your Notion account and created your first workspace.
Navigating the Notion Interface
Navigating the Notion interface is an integral step towards mastering this versatile tool, allowing you to effectively organize, manage, and streamline your digital workspace.

Understanding the Left Sidebar, Main Workspace, and Page Menu
Picture this: the left sidebar in Notion is like your personal command center. It’s where you’ll find your workspaces, pages, and settings. It’s also where you’ll create new notion pages, and even engage in a little housekeeping by dragging pages around to organize them.
Next up, we have the main workspace. Think of this as your digital canvas, waiting for you to fill it with your ideas, tasks, and projects. It’s where the magic happens!
Lastly, there’s the page menu. This handy feature is like a Swiss Army knife for your pages. You can duplicate pages, move them, delete them, and even export them. It’s all about giving you control over your own page and content.
Basics of Creating a New Page
Creating a new notion page is as simple as clicking a button – literally! Here’s the lowdown:
- Click on the ‘+ Add a Page’ button in the left sidebar.

- Give your page a title that captures its purpose.
- Start adding content! You can type text, add images, embed links, and so much more.
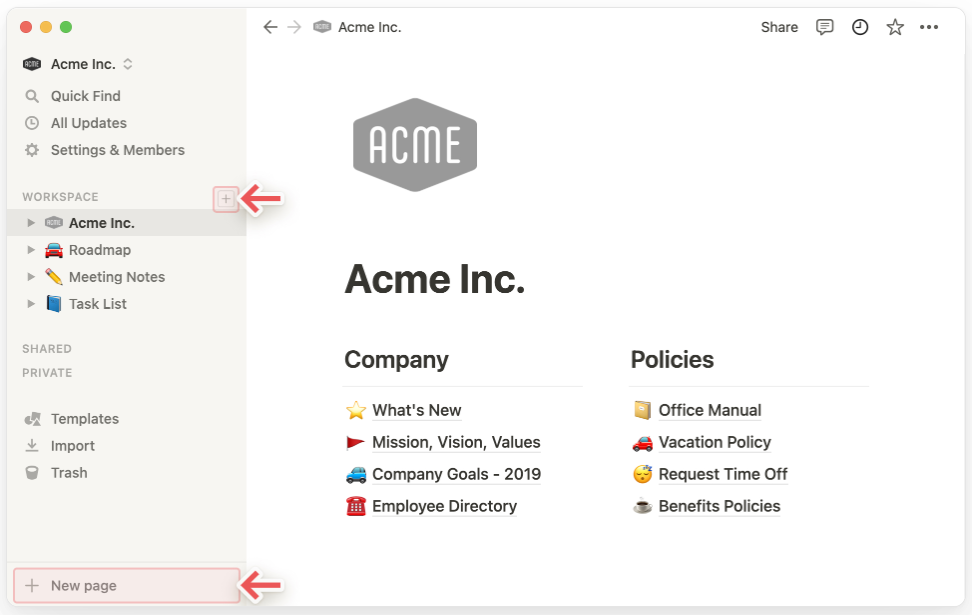
And just like that, you’ve created your first page. High five!
Exploring Different Views: List, Board, Table, Calendar, and Gallery
Now, here’s where things get really exciting. Notion allows you to view your pages in different ways, each offering its own unique benefits. It’s like having multiple lenses to view your content through.
- List View: Perfect for linear thinkers, or when you want to see everything in a neat and organized list.
- Board View: Ideal for visualizing workflows or project stages. It’s like having a Kanban board right in your workspace!
- Table View: Great for when you’re dealing with data, or when you want a high-level view of everything.
- Calendar View: The go-to view for scheduling and timeline-based planning. Never miss a deadline again!
- Gallery View: This one’s for the visual folks. It presents your pages as cards in a grid, making it easy to see everything at a glance.
Remember, the beauty of Notion lies in its flexibility. Feel free to play around with different views and find the one that suits your workflow best. After all, Notion is all about empowering you to work your way. So go ahead, explore, experiment, and most importantly, e
Creating and Managing Pages
Creating and managing pages in Notion is a straightforward process that empowers you to organize your content efficiently, providing a streamlined way to structure your work or personal projects.
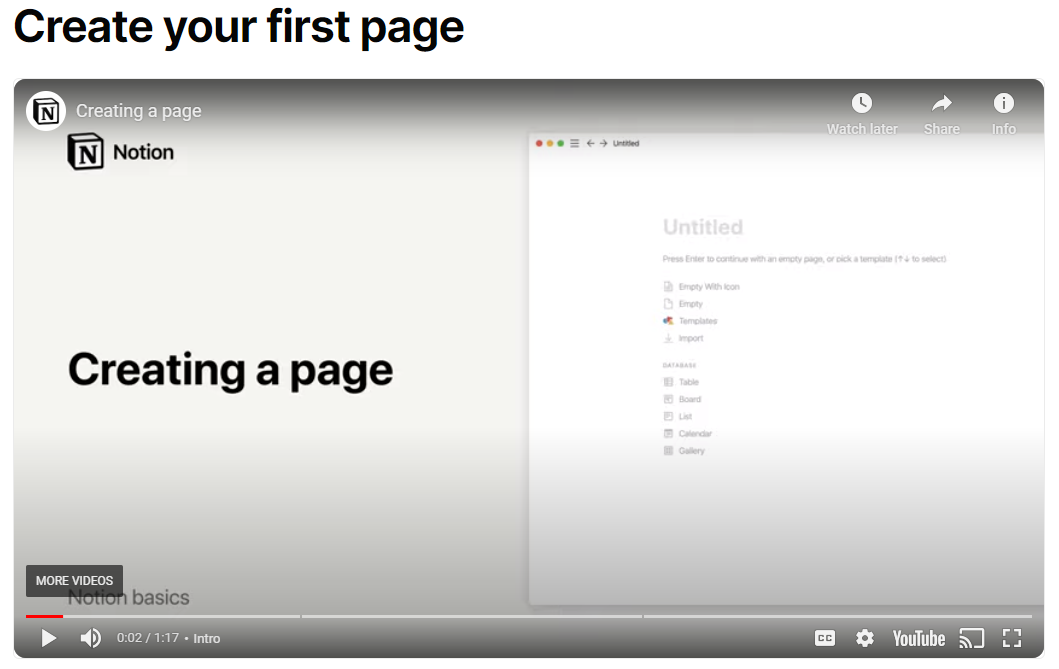
Detailed Instructions on How to Create Pages
Alright, let’s roll up our sleeves and create your first page.
- Take a look at that left sidebar (your command center, remember?). See the ‘+ Add a Page’ button? Give it a click.
- A blank page will open up in your main workspace. Time to give it a name! Make it something that captures what you want to use the page for.
- And voila! You’ve just created a new page.
Adding Text, Images, and Other Multimedia
Now, a blank page is like a canvas waiting to be filled. And Notion gives you a whole palette of options – text, images, and other multimedia.
To add text, just start typing. Want to add an image? No problem! Just click where you want it, select the ‘+’ button, and choose ‘Image’. You can upload one from your device or insert a link from the web. And guess what? You can even add videos, audio files, code snippets…the list goes on. Feel free to play around and see what you can create!
Organizing Pages into Folders and Sub-Pages
Now, here’s a neat trick: you can organize your pages into folders and sub-pages. It’s like having a digital filing cabinet!
To create a sub-page, open the page where you want the sub-page to live, click on the ‘+’, and then select ‘Page’. It’ll appear as a nested page under the main one. And to move a page into a folder, simply drag and drop it in the left sidebar.
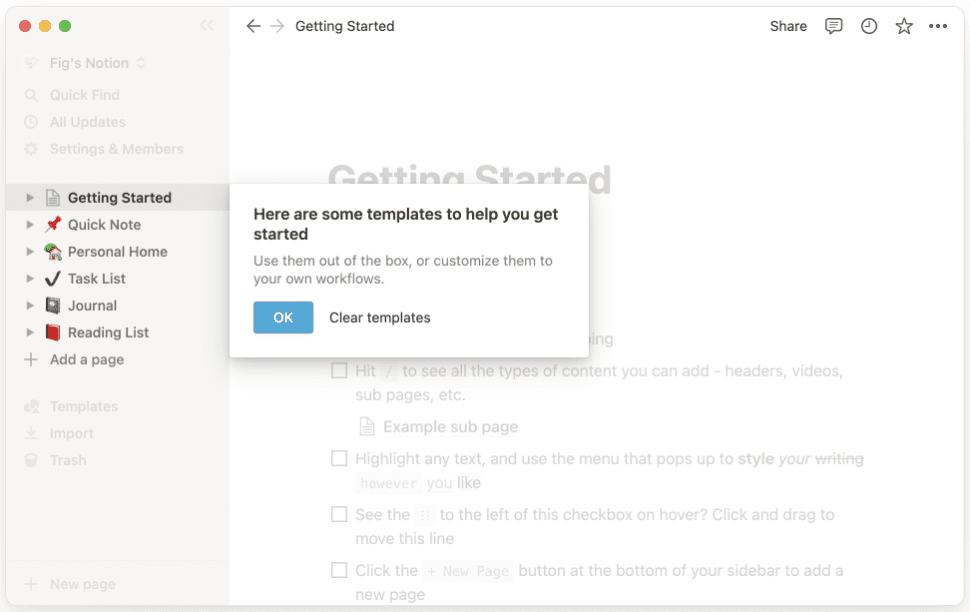
Using Templates for Quick Page Creation
But wait, there’s more! If you’re looking to save time (and who isn’t?), Notion’s got a library of templates that you can use. Whether you need basic notion templates like blog post, meeting agenda, a project roadmap, or a content calendar or more complex tasks, there’s a template for that. Just browse the template gallery, pick one you like, and click ‘Use this template’.
Taking Notes with Notion
As someone who’s been in the trenches of note-taking, I can tell you this: Notion is a game-changer. It’s not just your average note-taking app, it’s a powerful tool that can transform how you capture, organize, and interact with information.
Using Notion for Class Notes, Meeting Minutes, and More
Picture this: All your class notes, meeting minutes, project ideas, reading lists, even your random brainstorms, all neatly organized in one place. Sounds like a dream, right? Well, with Notion, it’s your new reality.
Whether you’re a student jotting down lecture notes, a professional capturing key points from a meeting, or a creative soul documenting your brilliant ideas, Notion has got you covered. It’s like having a digital notebook that’s infinitely customizable and always at your fingertips.
How to Write, Edit, and Format Notes
Now, let’s get down to the brass tacks—writing, editing, and formatting your notes.
- Kick things off by clicking ‘+ Add a Page’ and giving it a snappy title.
- Start pouring your thoughts onto the page—Notion saves your work as you go, so you never have to worry about losing your precious notes.
- Make your notes shine by using headings, bullet points, numbered lists, and more. Just select the text and pick the formatting option that tickles your fancy.
- Add a splash of emphasis with bold, italic, underline, or strikethrough. Again, just highlight the text and choose your style.
Adding Links and References to Notes
But wait, there’s more! Notion lets you add links and references to your notes. This is a real boon when you’re studying or researching and want to keep track of valuable resources.
Adding a link is as simple as highlighting the text you want to hyperlink, hitting the ‘Link’ button, and popping in the URL. And if you want to reference another page in your workspace, just type ‘@’, start typing the name of the page, and pick it from the dropdown list. It’s like weaving your own web of knowledge!
Using the Web Clipper to Save Articles and Websites
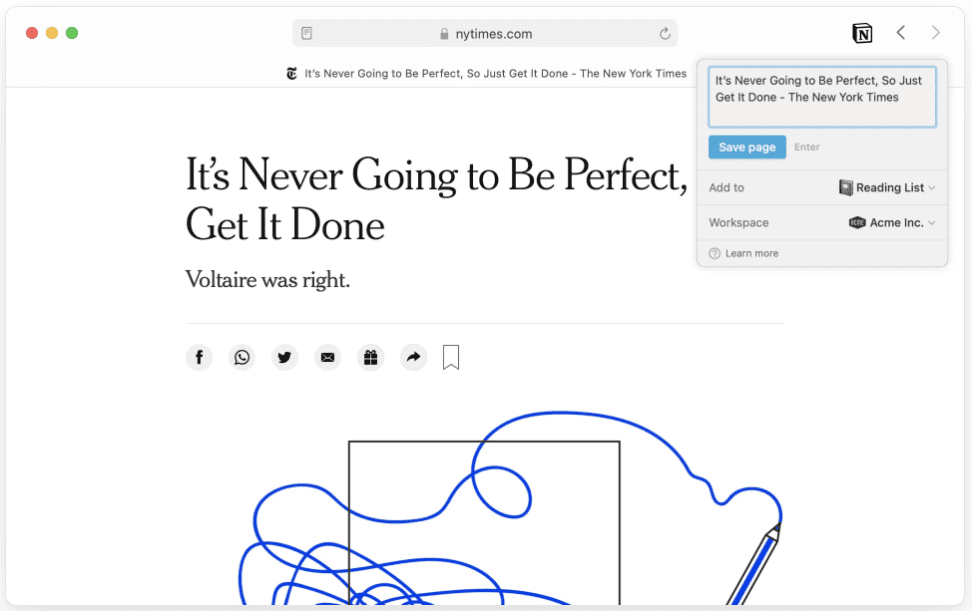
And here’s the cherry on top: Notion’s Web Clipper. This nifty tool lets you save articles and websites directly into your workspace.
Just add the Notion Web Clipper extension to your browser, navigate to the page you want to save, click the Notion icon in your toolbar, and choose where you want to save it in your workspace. Add any notes or tags, and bam! You’ve got a permanent, easily accessible record of that page. You can also integrate your google docs or import your word document to Notion.
You’re now equipped with the know-how to supercharge your note-taking with Notion. Go ahead, give these features a spin and see how they revolutionize your note-taking game. Remember, the journey of a thousand notes begins with a single page.
Using Notion for Task Management
Feeling overwhelmed with sticky notes, email reminders, and half-finished to-do lists? Well, there is some good news for you. Notion, is here to bring some much-needed order to your chaos.
Creating a To-Do List and Setting Due Dates
Let’s start with the basics: creating a to-do list. It’s as simple as 1-2-3!
- Open up a new page in Notion and give it a name. ‘My Awesome To-Do List’ or ‘Conquering the World’, whatever floats your boat.
- Click on the ‘+’, select ‘To-do list’, and start typing your tasks. You can even nest tasks under each other for more complex projects.
- Now, here’s the cool part. For each task, you can set a due date. Just click on the task, select ‘Date’, and choose your deadline.
And just like that, you’ve got a living, breathing to-do list that doesn’t let deadlines slip through the cracks!
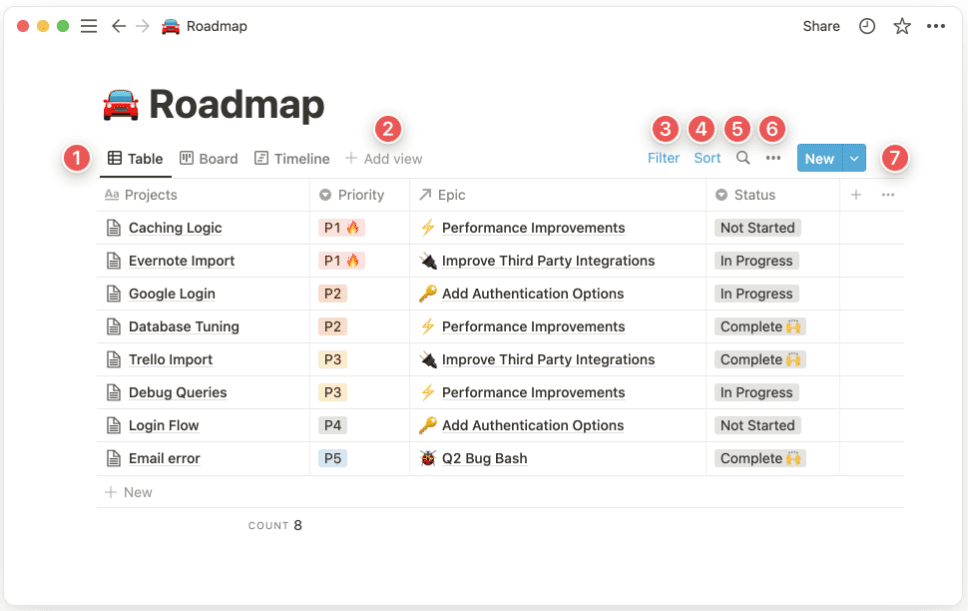
Tracking Progress with Project Boards
But what if you’re handling a bigger project? That’s where Notion’s project boards come in!
Imagine a digital board with cards representing different tasks. You can move these cards between columns like ‘To Do’, ‘Doing’, and ‘Done’ as you make progress. It’s a visual, intuitive way to track your project’s progress.
To create a project board, click ‘+ Add a Page’, select ‘Board’, and start adding tasks. You can customize the columns to fit your workflow, create templates, and even assign tasks to different team members if you’re working collaboratively. It’s like having a project manager right at your fingertips!
Setting Up Reminders and Notifications
Now, life’s busy. And it’s all too easy to forget about that report due next week or the dentist appointment you scheduled a month ago. But don’t worry, Notion’s got your back with reminders and notifications.
When you set a due date for a task, you can also add a reminder. Just click on the date, then ‘Remind’, and choose when you want to be reminded. Notion will send you a notification so that upcoming deadline won’t catch you off guard.
With Notion, task management becomes a breeze. You’re not just ticking off boxes—you’re staying on top of your work, tracking your progress, and meeting your deadlines without breaking a sweat.
Advanced Features of Notion
Now, we know that Notion is a fantastic tool for note-taking and task list management. But did you know it’s also a powerhouse when it comes to handling complex projects and data manipulation? Oh yes, it’s true!
Using Databases for Complex Projects
Databases in Notion are like a well-organized closet. Everything has its place, and you can find exactly what you need in an instant. They’re perfect for managing complex projects, tracking inventory, planning content calendars – you name it!
Creating a database is a breeze. Just click ‘+ Add a Page’, select ‘Table’ (or any other database view that suits your needs), and start adding your data. You can customize the properties of each item—like status, assigned to, due date, and more to keep your project on track. It’s like having a personal assistant that keeps everything in check!
Connecting Pages and Databases with Relational Links
Now, here’s where things get really interesting. Notion lets you create relational links between pages and databases. Imagine being able to link your project tasks to relevant meeting notes, or your content calendar to related research articles. It’s like building your own interactive web of knowledge!
To create a relational link, add a new property to your database, choose ‘Relation’, and select the page or database you want to link to. Then, you can link items together to create meaningful connections.
Utilizing Formulas and Rollups for Advanced Data Manipulation
If you love crunching numbers or need to analyze data, you’re going to adore Notion’s formulas and rollups. They’re like your personal data wizards, helping you calculate, summarize, and manipulate data right within your databases.
Formulas let you perform calculations on your data, just like in a spreadsheet. And rollups allow you to pull in data from related databases and perform calculations on them. To use them, simply add a new property to your database, choose ‘Formula’ or ‘Rollup’, and create your calculation.
Wrapping It Up
From note-taking and task management to databases and data manipulation, we’ve explored the nooks and crannies of this fantastic tool.
Just remember, Notion is more than just a tool—it’s your digital workspace, your personal assistant, your canvas for ideas. It’s there to empower you, to help you navigate your work and life with ease and joy. So go ahead, take what you’ve learned and make it your own. Experiment, explore, and most importantly, have fun!
Frequently Asked Questions
How do you use Notion efficiently?
Start by customizing your workspace to suit your needs and workflow. Use keyboard shortcuts and templates to speed up your navigation and task execution.
How do you start a Notion for beginners?
Begin with the basics – create your main page, add new pages for different topics, and explore different blocks such as text and tables. It’s all about learning as you go!
What is the main use of Notion?
Notion is a versatile tool used for note-taking, project management, team collaboration, and more. It’s a one-stop shop for all your organizational needs.
How do you use Notion for daily use?
Create a daily planner or to-do list, set up reminders for tasks and deadlines, and make habit trackers. Customize it to fit your daily routine.
How do I organize pages in Notion?
Use a hierarchical structure for your pages and subpages. Categorize them using the sidebar menu and labels for easy navigation.
Is using Notion a skill?
Absolutely! Mastering Notion involves understanding its features, organizing information effectively, and adapting it to your specific workflows. Practice makes perfect!
All image credits go to notion.so